Mac Mini Upgrade SSD - External SSD Upgrade for Final Cut Pro X
Октябрь 22, 2016
Mac Mini Upgrade SSD — External SSD Upgrade for Final Cut Pro X
PNY Elite Portable SSD: http://amzn.to/2ehfz5g
Sandisk Extreme 500 SSD: http://amzn.to/2dy6jpr
Samsung T3 Portable SSD: http://amzn.to/2dJHKcw
Sabrent USB hub : http://amzn.to/2eEKjv7
Today’s video is for folks who have a Mac, like a Mac mini, and want a faster hard drive for better performance. You could always replace the internal hard drive with an SSD, but that’s a pretty complicated job. For those of you who don’t want to use this technique, here’s a simple way to improve your computer’s performance using an external SSD. And this improves your performance a lot, when it comes to things like video editing. I’ll be using a PNY Elite Portable SSD today, but you can use any portable SSD you’d like. I’ll leave links to some portable SSD’s that’ll work well for this upgrade, right below this video. The process is pretty much the same whether you have a Mac Mini, iMac or even a MacBook. And it’s probably very helpful for folks who plan to use their Macs for Final Cut Pro. So let’s get started.
The first step is pretty simple. Plug the SSD into any USB port on your computer. You’re going to have to leave the drive plugged in permanently, so make sure you’re not going to need that USB port. Now in case you need more USB ports you could always use a powered usb hub like this one. And i’ll leave a link to that below. Once the SSD turns on and is recognized by your mac, you’re going to need to format it. Formatting it removes any data on the drive and ensures that the drive works efficiently with your Mac. Now if there are any files on this SSD that you need, make sure to transfer them before you format it. To format it, click on launchpad, then click on the icon called “other” and then click on Disk Utility. Once that opens up, click on your SSD, which in my case is “PNY Elite” and then click on the Erase button on top. Now you might wanna give the SSD a new name. I’ll call mine PNY Elite FCP, because I am going to be using it mostly with Final Cut Pro. Then click the drop down menu next to the word Format and select the OS X Extended (Journaled) format. And then click Erase and wait for it to finish formatting. Once it finishes formatting, it might ask if you’d like to use it with Time Machine. Click dont use.
Now most people are going to want to do this upgrade to ensure Final Cut pro runs faster. And in order to do this, I am first going to create a dedicated folder on my SSD for Final Cut. Double Click on the SSD which is visible on your desktop. Right click in the white space when it opens up and then select “New Folder”. I am going to call my new folder “Final Cut New Library”. And I am going to ensure that all my Final Cut Events, Media and Final videos are all stored in this folder. Storing your entire library on the SSD, helps Final Cut run much faster especially, if you have limited RAM, a base processor and a mechanical hard drive, like the one on this Mac Mini that I’m using today.
To ensure all the events are stored on the SSD, open up Final Cut. Click File, New and then select Library. It the asks you where you want to Store this Library and what you want to call it. I am going to select my SSD and then open up the Folder we created. Then I am going to call my New Library, “Final Cut New”. Then Hit Save. You’ll notice on the events bar on the Left, a new Library called Final Cut New has been created. Now if you click on the Library and then create a new event in that library all the media will now be stored on the SSD. Now for any events you want to bring from your old library, simply click and drag the event from the old to the new library. And to ensure you don’t have your old library visible and don’t accidentally use it, right click on the Old Library, and click Close Library. Having the Library saved on the SSD, makes importing clips into an event much faster and also prevents the computer from freezing up when editing. And this is because of the SSD’s faster Read and Write Speeds.
For things like photo editing, I’d recommend saving these files on the SSD first and then editing them in things like Photoshop. This will also ensure the editing software performs better.
Again, I’ve left links to some popular SSD options in the description below. Hope this video was useful. If it was, please hit that LIKE button and subscribe for more reviews and how-to videos. Thanks for watching and see you next time
443 33
35,046 просмотров

Mac Mini 2018 - Purchase Advice from a Mini User!
I created this very channel with a Mac mini from 2011 and for that reason alone, the mac mini is very special.
And although Apple has increased the price on the mini, I still believe that the improvements and options outweigh the price hike. Having more options is always great. Now users can add eGPU, and add their own RAM for far less. If you can survive with external storage, you can save a lot of money.
This new Mac mini is now the entry level for those that want to begin editing on FCPX and perhaps create their own Youtube channel.
It all started with a Mac mini.
Amazon (Helps support channel)
►https://amzn.to/2qrGFeK
Social
►Website : https://www.trustmacintosh.com
►Twitter : https://twitter.com/TrustMacintosh
►Instagram : https://instagram.com/trustmacintosh/
My Video Gear
►http://www.trustmacintosh.com/mygear/
#macmini #6core #beastmode
820 83
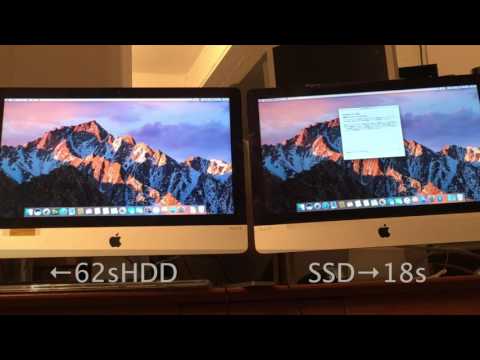
iMac 21.5 Late 2012 HDD vs SSD vs FusionDrive
たまたま同じiMac 21.5 Late 2012がありましたので、HDD と SSD と FusionDriveの起動スピードを比べてみました。FusionDriveのリンゴマークが出るのが遅いですね。起動ディスク設定のせいかと思いましたが特に異常はありませんでした。撮影が雑なのはご愛嬌ということで。
114 8

Macbook Tip: How to Install and Run Windows on an external USB Drive - Windows To Go
WARNING for Touch Bar Macbooks — make sure audio driver is up to date: http://lon.tv/9q43x — Buy the PNY drive here: http://lon.tv/lvcxp (affiliate link). Buy a mac here: http://lon.tv/tnc98 (affiliate link) — Macbook and iMac owners can install Windows on an external USB drive and boot natively to Windows with these steps. This is ideal for gamers, other apps easier run in a virtual machine alongside OS X.
Prerequisites: — Windows PC (virtualized PC might work too)
— Windows 10 ISO — http://lon.tv/winiso (download on a non-Windows PC)
— Rufus for Windows — http://lon.tv/rufus
— USB Flash drive & adapters if needed
— USB Keyboard and mouse (this is a cheaper alternative to what I showed in the video — http://lon.tv/ircav (affiliate link)
Other drives that are known to work in my testing:
Samsung T3 — http://lon.tv/upmxz (affiliate link)
Sandisk Extreme SSD — http://lon.tv/w6i4z (affiliate link)
See how it performs vs. a Windows laptop:
https://www.youtube.com/watch?v=jw7B2x-PN0E&index=2&list=PLCZHp4d1HnIswv9CYqV0MycB8lrb5XIYL
What happens if you unplug the SSD? See here:
https://www.youtube.com/watch?v=_ox-fxRwEGY&index=4&list=PLCZHp4d1HnIswv9CYqV0MycB8lrb5XIYL
VIDEO INDEX:
00:02 — Introduction
00:53 — Alternative to this method (Bootcamp / Virtualization)
02:24 — Prerequisites
04:41 — Windows 10 ISO download instructions
06:01 — Downloading Mac drivers for Windows from Apple
07:46 — Using Rufus to create the Windows To Go installation
10:42 — Copying Windows drivers to the SSD
11:26 — Prepping the Mac to boot Windows
12:09 — How to direct the Mac to boot from external drive
13:37 — Finishing the Windows installation on the Mac
14:10 — Licensing and activation
14:51 — Installing Windows drivers
17:24 — Conclusion and Final Thoughts
Subscribe to my email list to get a weekly digest of upcoming videos! — http://lon.tv/email
See my second channel for supplementary content : http://lon.tv/extras
Visit the Lon.TV store to purchase some of my previously reviewed items! http://lon.tv/store
Read more about my transparency and disclaimers: http://lon.tv/disclosures
Want to chat with other fans of the channel? Visit our forums! http://lon.tv/forums
Want to help the channel? Start a Patreon subscription!
http://lon.tv/patreon
Follow me on Facebook!
http://facebook.com/lonreviewstech
Follow me on Twitter!
http://twitter.com/lonseidman
Catch my longer interviews in audio form on my podcast!
http://lon.tv/itunes
http://lon.tv/stitcher
or the feed at http://lon.tv/podcast/feed.xml
Follow me on Google
http://lonseidman.com
4094 144

Why I Bought The Late 2014 Mac Mini in 2016- By T. Fr@nk
Why I Bought The Late 2014 Mac Mini — By T. Fr@nk
The following video tells you why I decided to buy the late 2014 Mac Mini, but is not an actual review. I hope that you find this video helpful, and let me know if you own a Mac Mini or have found yourself in a similar situation as a new Youtuber. Thanks for watching!
~ T. Frank
Support The Channel By Using My Affiliate Link(s):
▶Buy the Mac Mini here:http://amzn.to/2bqiV4j
▶ Shop using my Amazon Affiliate(US) link: http://amzn.to/2mHSz4j
▶ Shop using my Amazon Affiliate(UK) link: http://amzn.to/2jXIQGo
▶Amazon Prime Membership:http://amzn.to/2Fcc4Yd
▶Amazon Audible Membership:http://amzn.to/2tfvIBo
▶Recommended products: https://rebrand.ly/tfranksrecommendations
TubeBuddy:
▶https://rebrand.ly/tfranktubebuddy
Donations:
▶Cash me:http://cash.me/$timekafranklin22
▶Paypal.me:https://www.paypal.me/TimekaFranklin
E-mail:
▶E-mail for business inquiries only: [email protected]
Social Media:
▶Twitter: https://twitter.com/timeka_franklin
▶Instagram: https://www.instagram.com/timeka_franklin
▶Facebook:https://www.facebook.com/timekafranklin22
▶Snapchat:TimekaFranklin
Music:
▶( YouTube Library): Rhodesia by Twin Musicom is licensed under a Creative Commons Attribution license (https://creativecommons.org/licenses/by/4.0/)
Artist: http://www.twinmusicom.org/
My video creator kit:
▶The kit used to film this video: http://kit.com/Timeka_Franklin
My Notes:
Zoom H1 w/Boya BY-M1 44/16 74, Late 2014 Mac Mini, Final Cut Pro X.
DISCLAIMER: The Late 2014 Mac Mini was purchased with my own money, and this is not a sponsored review.The Amazon links provided are affiliate links and commission made from this will be used to purchase more review items.
262 13
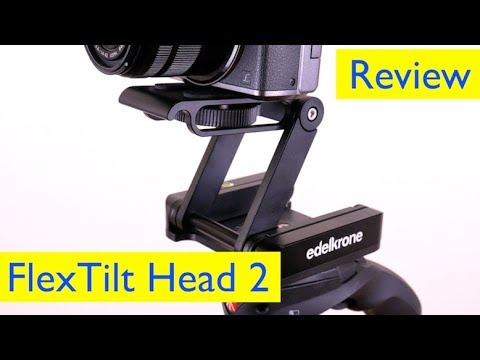
Edelkrone Flextilt Head 2 Pan/Tilt Head Unboxing, Setup and Review
EdelKrone Flextilt Head 2 Pan/Tilt Head Unboxing, Setup and Review
EdelKrone FlexTilt Head 2: https://edelkrone.com/products/flextilt-head-2
Edelkrone QuickRelease One: https://edelkrone.com/products/quickrelease-one
In this video I unbox, setup and review the Edelkrone Flextilt head 2. The Flextilt Head 2 in a very versatile camera head that allows you to position your camera in several creative positions.
107 17

PNY Elite Portable SSD Review and Speed Test
PNY Elite Portable Solid State Drive (SSD) Review and Speed Test
Link to PNY Elite 240GB SSD: http://amzn.to/2djGhen
Link to PNY Elite 480GB SSD: http://amzn.to/2djEuFX
Today I’m reviewing the new PNY Elite Solid State External Hard Drive. The PNY Elite SSD is currently available in two sizes, 240GB and 480GB. The unit I am testing today is the 240GB version. The PNY elite SSD is an extremely compact device measuring about 2.5” x 1.5” by just 0.3” thick. And just to give you an idea of how compact it is, this is how it looks when compared to a full size sd card.It’s also an extremely lightweight drive and just to give you a sense of how light, I compared it to the 500GB version of a regular mechanical, external hard drive, the WD Digital Passport Ultra, which weighed in at 150g. The PNY Elite on the other hand weighed a measly 50g. And what’s surprising is that both the 240GB and 480GB version weigh about the same and are almost the same exact dimensions. Very useful if you need access to your files on the go. The Elite SSD is also a very simple device. The drive’s casing is made from aluminum and has a USB 3.0 port to the right hand side. To connect the drive to your computer, plug the provided USB cable into the port on the right and then plug the cable into any usb port on your computer. The LED next to the USb port will turn red. As I mentioned, the Elite can transfer at USB 3.0 speeds and you will need USB 3.0 to make use of it’s fastest read and write speeds. However, it will work with any older USB 2.0 port, in case your computer has such a port. And it will work with almost any Mac or PC. Now before using your drive for the first time, make sure to format it. This erases anything that’s stored on it and also ensures that your drive works properly with your OS. Now if you’re using it only with a Windows computer, format it in the NTFS format. And if you plan to only use it with a Mac, use the OS X extended format. However, if you plan to use it with both Macs and PCs, use the ExFat option, which allows the drive to be used both by Macs and PCs. Now another major advantage of an SSD, like this one, is speed. And while PNY has published numbers for how fast this drive is, I wanted to see just how fast the Elite performs in real-world conditions. So I used BlackMagic’s speed test software with a 5GB load, to run a series of Read-Write Tests. And for comparison, I compared it a popular mechanical drive, the Toshiba Canvio Basics. And the results were actually pretty clear. The Elite SSD was much faster than the Canvio, especially when it came to Read Speeds. Now it’s certainly nowhere close to the Maximum speed PNY advertises, but it’s still a very fast drive. And to take the testing one-step further, I wanted to see how fast the drive could write a 2minute 4K video file from Final Cut Pro. For comparison I also wrote the same exact file to The Toshiba Canvio, A Sandisk Extreme SD card and the built-in flash storage on the MacBook Pro, and timed all these drives too. Now while all the drives performed very respectably. The MacBook Pro’s drive and the Elite were tied for first place at 2 minutes and 49s. The Sandisk Extreme clocked in at an impressive 3 mins and 30s. The Canvio finished at a respectable 3mins and 55s. So in terms of speed, the Elite SSD does perform very well. While it’s certainly not as fast as PNY advertises, it’s definitely a huge improvement over most mechanical hard drives. This is very useful for things like video editing, where you might want a faster hard drive to speed up the performance, without replacing the internal hard drive. For example, on computers like the Mac Mini, where you wanna add a faster drive to run something like Final Cut Pro, the PNY Elite is a simple and inexpensive way to do it. And I’ll put up a separate video on how to do that, so stay tuned for that video. So should you buy the PNY Elite SSD. Absolutely! It’s an extremely portable device that lets you carry a lot of data around and it’s also a great upgrade if you want a faster drive for intensive processes like photo or video editing. Now I would recommend paying the extra money and getting the 480GiG version. It’s just better value for money, and you’ll always need the extra storage. I’ll leave links to both versions below. So feel free to take a look. If you own one of these, tell us about your experience, in the comments below. If this video was useful, please give us a big thumbs and please subscribe for more reviews. Thanks for watching and see you next time!
130 6

iMac / Mac mini SSD nachrüsten ohne Einbau, Upgrade Anleitung
Apple iMac und Mac mini SSD nachrüsten ohne Garantieverlust und ohne den Mac zu öffnen: Kein Einbauen der SSD, alte HDD wird nicht ausgetauscht, externes SSD Upgrade per Thunderbolt / USB 3.0
*** Die versprochenen Links und Befehle: ***
— Thunderbolt SSD (verschiedene Größen) günstig bei Amazon:
http://amzn.to/295dmV9
— USB 3.0 SSD (verschiedene Größen) günstig bei Amazon:
http://amzn.to/29aW5MW
(Wenn du auf die Amazon-Links klickst und irgendwas bei Amazon kaufst — es muss keiner der angezeigten Artikel sein — dann bezahlst du den gleichen günstigen Preis wie immer und ich bekomme eine kleine Provision von Amazon bezahlt. Vielen Dank!)
— Terminal-Befehl:
sudo trimforce enable
— Time Machine Backup erstellen:
https://youtu.be/EudD7KBX6As
— Festplatten formatieren am Mac:
https://youtu.be/vfhNnsgWTEY
— Carbon Copy Cloner gratis Testversion (wird nur 1x verwendet und kann danach gelöscht werden, es ist also EGAL, dass sie nur 30 Tage funktioniert):
http://bombich.com
— gratis Blackmagic Disk Speed Test:
https://itunes.apple.com/de/app/blackmagic-disk-speed-test/id425264550?mt=12
Dieses Tutorial bitte im Vollbildmodus in HD (1080p) ansehen, um die beste Qualität genießen zu können!
Auf meinem deutschsprachigen YouTube Kanal gibt es weitere Tutorials, Lehrvideos und Hilfevideos zur Erklärung von verschiedenen Computerproblemen. Dies ist der Link zu meinem Kanal: http://www.youtube.com/user/VivaLaMaxico
Und hier findest du mich bei Facebook: https://www.facebook.com/maxicoentertainment
Und das ist mein Twitter Account: http://twitter.com/maxico86
Impressum und Haftungsausschluss findest du in meinem YouTube Kanal verlinkt.
Links können Affiliate-Links bzw. Partnerlinks sein.
Dieses Lehrvideo wurde auf einem Apple iMac mit Final Cut Pro X geschnitten und mit einer Sony Alpha 6000 Systemkamera in FullHD gefilmt.
1973 72

Edit Final Cut Pro Using External Drive - 2017
Thanks For Watching!
Don't forget to like, comment and subscribe!
—-
Connect with me!
Twitter — michael_billig
2306 32

Mac Mini 2014 Review: A Terrible Shame
Support me on Patreon: http://ow.ly/3ymWFu
Previous Video: http://ow.ly/3teqXT
Help Support My Channel. PayPal Donations Welcome. Click here: http://goo.gl/NSdOvK
Sign up to our Monthly Newsletter to receive exclusive FREE Computing Forever video and blog content:
http://goo.gl/YKq7ZK
SUBSCRIBE TO THIS YOUTUBE CHANNEL: https://www.youtube.com/user/LACK78
KEEP UP ON SOCIAL MEDIA:Twitter : http://twitter.com/lack78Facebook : https://www.facebook.com/ComputingForever
Google : LACK78: http://goo.gl/k4gWsg
Google : Computing Forever: http://goo.gl/Q8gZpY
ALL MY TECH BLOGGING NEWS CONTENT:http://computingforever.com
MORE VIDEO AWESOMENESS:
http://youtube.com/daveknowsstuff
9280 904
8 easy ways to speed up your Mac
More Apple news: http://www.cultofmac.com
one of our most popular videos is how to speed up your Mac. Well it’s now over 5 years old, which means it’s time for a new update with new speed-boosting tips.
A lot of the tips in that video still stand true today, so If you haven't seen it already, go and check it out here
https://youtu.be/BR7FGiIMz2E
In this video I’m going to show you 8 more great tips to speed up your Mac.
Follow us!
Twitter: https://twitter.com/cultofmac
Facebook: https://www.facebook.com/cultofmac
Instagram: https://instagram.com/cultofmac/
2627 190
